In my previous life, I wrote in C++ and later C#, and used both to share code by compiling it to a “library file,” which I and my team could then copy to other projects. Sharing code libraries like this is important so that we aren’t rewriting or duplicating common code again and again for new projects.
It seems like it should be as simple to do this in TypeScript. We just compile to JavaScript (which we can think of as our new version of the “library file”) and then copy the JavaScript code to other projects.
In practice, though, it’s not so simple. By definition, complex applications — like the modern ones we’re building in TypeScript these days — are composed of multiple interacting parts.
Have you ever been coding in TypeScript and seen an error message like this?
File 'X’ is not under 'rootDir' 'Y'. 'rootDir' is expected to contain all source files. ts(6059)
This means you’re trying to import code from outside your current project. Most likely, you’re just trying to share code from one project to another!
But, how do we actually share code libraries between projects?
One way is to create separate code libraries that factor our application by functionality, allowing us to reuse our most commonly used and useful code between projects. See a representation of this in Figure 1.
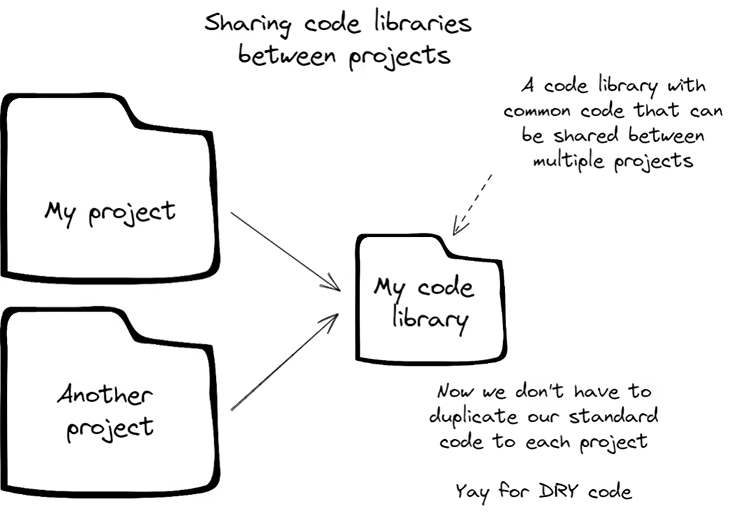
Figure 1: Sharing code libraries between projects.
The folder image is from OpenClipArt
In fact, there has been no elegant way to do this until TypeScript v3.0 — but we’ll get to that soon.
This blog post demonstrates the most recent results of my search to find a similarly lightweight way to share code libraries in TypeScript. In this post, we’ll fix this issue before moving onto more advanced methods of sharing TypeScript code, such as sharing between microservices and Docker images or sharing between the backend and the frontend.
We can get a lot of value from this, even within a single application. When the nature of the application’s structure is to be separated into components (e.g. microservices, backend/frontend, micro frontends, etc.), we can easily see the need to share common functions and data structures within a single application.
If you want to DRY your code across application components, this is what you must know.
Reviewing the standard methods
Before we tackle the example code, let’s briefly review the standard ways of sharing code in the JavaScript community.
The most common method is to publish our code to the npm registry, so it can be installed as a dependency in any other project where we’d like to use it.
An alternative is to publish our code to a Git repository (it doesn’t have to be GitHub, but usually it is) and then use npm to install it directly from there.
Keep in mind that either method, publishing to the npm registry or publishing to GitHub, can be done either publicly or privately. Publishing publicly is the default, of course, but you can also publish privately when working on a codebase that is not open source.
These most common JavaScript publication approaches are relevant because they are also the most common way to publish TypeScript code. (If you need a quick refresher on this, have a look at this publishing guide.)
It’s rare that we’d ever normally publish TypeScript code directly instead of compiling it to JavaScript and publishing that. For many projects, though, publishing a shared code library seems like overkill.
For one, it’s a massive impediment to fast development, and two, it seems like a waste of effort to publish a library that I’ll only use for a handful of microservices, or when I want to reuse a data model on either side of a REST API. Really, it’s not usually worth publishing unless you want to share your data model with the world.
Limitations of the standard methods
During routine coding, I make frequent and iterative changes across the codebase. (When you do have to work this way for npm packages, make sure you’re using npm-link.) Some of these changes will turn out to be unnecessary or bad (e.g. they break something), but we need the freedom to experiment with our code and then back out of it when it’s not working out. It’s fundamental that we can experiment and test our work without needing to commit and publish it first.
I usually ask myself the following questions before publishing my code libraries on npm:
- Is the library designed for standalone use in any other project?
- Do I want to share it with other people?
- Is or should this library’s code be open source?
Still, there are some other cases where publishing to npm can be a drag on efficient development — and that’s where we need to find alternative methods of sharing our code.
Exploring alternative methods for sharing TypeScript code
So, above, we established the following guidelines for developing an alternative method of sharing code:
- On complex projects, we’d like to make use of shared code libraries so that we can reuse code across components of the application
- Publishing code to a Git repository or npm can be unnecessary and even an impediment to the speed of our workflow, depending on the situation
With that in mind, let’s move on to the main event: looking at alternative means of sharing TypeScript code libraries between our projects.
Getting started
In this blog post, we’ll walk through code from several examples.
The first example is a basic but necessary starting point. You need to install Node.js to run it.
The second example is more advanced and shows you how to share a code library into a Docker-based microservice. You need to install Docker to run it.
The third and final example shows how to share code between a Docker-based microservice and a frontend built with React, TypeScript, and Parcel. You need both Docker and Node.js installed to fully build and run this example, but if you want to build the frontend only, you just need Node.js.
The code is available on my GitHub, and you can either clone the code for yourself if you’d like to follow along:
git clone [email protected]:ashleydavis/sharing-typescript-code-libraries.gitOr download the zip file and unpack it to your local computer.
The methods I present below allow for a flexible project structure. You can use these techniques with a mono-repo, or a meta-repo when using the meta-tool. You don’t have to use any repo if, for some weird reason, you don’t use version control — instead, you can use these techniques with an ad hoc directory structure on your local computer.
These examples do follow a particular layout, but that’s not really important. You can arrange the files and folders to suit your own taste and needs.
Finally, the methods presented here are also scalable. You can add more shared code libraries to each example and you can add more main projects (e.g. a project for each microservice).
Example 1: A primer for TypeScript project references
Please feel free to skip this section if you already understand how to use TypeScript project references.
TypeScript project references are actually quite new! They have only been available since TypeScript v3.0, which was released in 2018. According to the documentation, project references allow you to structure your TypeScript programs into smaller pieces, which helps improve build times, enforce logical separation between components, and organize your code in new and better ways.
Let’s start with the most basic example: a Node.js “Hello, World!” program that shows how to include a shared TypeScript code library to a Node.js project. This is fairly simple, but it is a necessary building block for the more advanced examples.
This example uses only a single shared library, but you can add more by adding references to your tsconfig.json file. Each of the referenced projects must be a valid TypeScript project and have its own tsconfig.json file.
Figure 2, below, explains the structure of the example project. Feel free to explore it for yourself in GitHub or on your local computer if you clone the code repository.
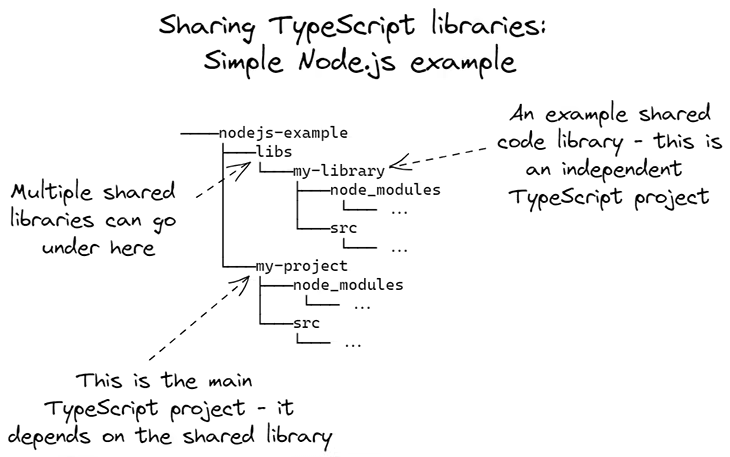
Figure 2: Using a shared TypeScript library in a Node.js project
The code for the shared library is presented Listing 1, below. It prints “Hello, World!” to the console.
Listing 1: Code from the shared library
export function showMessage(): void {
   console.log("Hello world!n");
}
The code for the main project imports the showMessage function from the shared library and calls it, as shown below in Listing 2.
Listing 2: The main project uses code from the shared library
import { showMessage } from "../../libs/my-library";

showMessage();
Like I said earlier, this example couldn’t be much simpler.
The interesting part is how project references are configured for the main project in its tsconfig.json file. An extract is shown below in Listing 3.
Listing 3: Extract from the main project’s tsconfig.json
"references": [
   {
      "path": "../libs/my-library"
   }
]
In Listing 3, we define an array of references to other TypeScript projects. This connects our main project to its shared libraries.
So how do we build the Node.js example project?
First, open a terminal window and navigate to the main repo’s directory, then into the Node.js example:
cd sharing-typescript-code-libraries/nodejs-exampleNow, navigate down to the main project:
cd my-projectWe can build the project now.
For an ordinary TypeScript project, we would invoke the TypeScript compiler, like this:
npx tscBut, now that we are using TypeScript project references, we must add the --build argument to the end:
npx tsc --buildThe --build argument causes the TypeScript compiler to read the references field from tsconfig.json. It then builds each referenced project before building the main project.
That’s it. At the most basic level, there’s nothing more to it.
This is a huge time saver! It means we don’t have to separately invoke npx tsc for each shared code library and, importantly, it means we’ll never forget to build a code library after changing its code — which will save us a lot of time spent wondering why our code change isn’t coming through to the main project.
As part of my personal convention, I wrap this up in an npm script called build. See the package.json file if you want to see what it looks like. Doing this means that I can invoke npm run build for any project, and it will automatically translate to npx tsc --build for TypeScript projects with shared libraries. I feel this is a nice touch because it means I don’t have to remember to add --build each time.
The good thing about this method for sharing is that it’s highly extensible. We can scale this up to many more shared code libraries and all we need to do is compile the main project.
Example 2: Sharing code libraries between microservices and Docker images
Let’s consider a more advanced example. Imagine we are creating a microservices application where each microservice is deployed from a Docker image. We have compiled code that we’d like to share between microservices and we need to bake it into each Docker image.
Though this will be more advanced, the example code here is essentially the same as in the previous example, except this time we’ll compile our main project and shared library within the Docker build process. We’ll then bundle and copy the compiled code into our production Docker image.
Figure 3 explains the structure of this project.
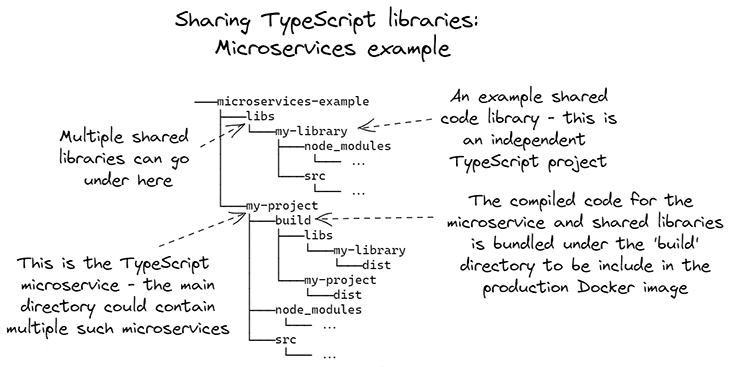
Figure 3: Sharing code between microservices
The important part of this example project is the Dockerfile we use to build the Docker image.
Figure 4 is an annotated version of the Dockerfile highlighting the most important parts.
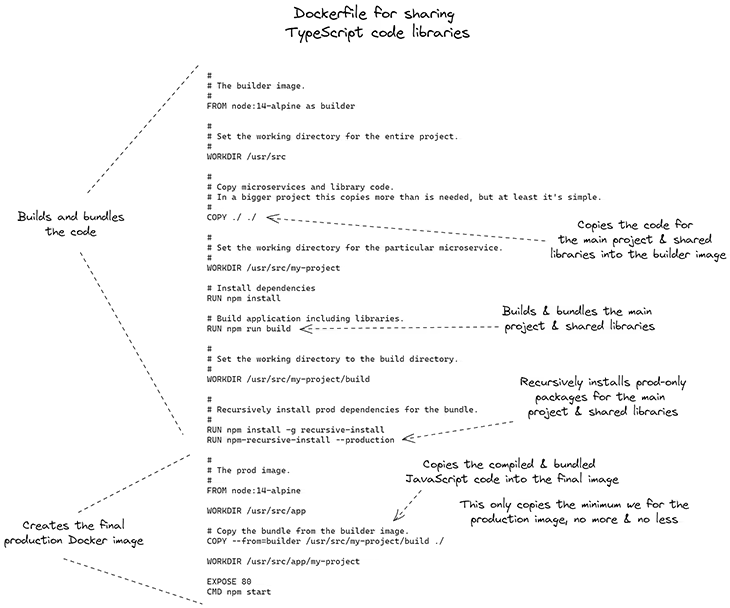
Figure 4: Annotated Dockerfile that can share TypeScript code libraries
Notice how we copy the entire root project here. This copies the code for our shared libraries and the main project into the build stage for our Docker image.
Next, we invoke npm run build to compile TypeScript to JavaScript and bundle the results. Then, we use the recursive-install tool to install production-only dependencies for the shared library and the main project.
Ultimately, to generate a production Docker image we must copy the compiled code bundle from the build stage into the final image. The final image should omit the TypeScript source code and dev dependencies, which simply aren’t necessary in production. Only the compiled JavaScript code and production dependencies are copied across.
So, we can say that the production image is lean and not bloated with the unnecessary debris of development, debugging, and testing.
One question remains. How exactly do we bundle the compiled JavaScript code?
You didn’t miss that. It is actually hidden within the npm run build. You can see how this works in Listing 4, which is an extract from the package.json file for the main project.
Listing 4: Extract from package.json
"scripts": {
    "build": "tsc --build && ts-project-bundle --out=build",
},
Our problem is that the compiled JavaScript code is embedded in each of the separate TypeScript projects. We must separate the compiled code, leaving behind the original TypeScript source code that we don’t need in production.
We have a few options for a solution. We could easily copy the code into our production Docker image by adding a bunch of copy commands to our Dockerfile, but then we’d need new copy commands for any new libraries we added, which is not very scalable. Plus, it’s better if we can have something that will instead copy what we have now and anything we might add in the future.
This is where ts-project-bundle comes into play, as you can see above in Listing 4. This is a small simple command-line tool that I created (and shared via npm, of course, because I want everyone to use it).
It reads the tsconfig.json files for the main project first, then for each referenced project. It then copies the compiled code to your output directory of choice. This is how the compiled JavaScript code is placed in the build directory and is ready to be copied into the final production Docker image.
Incredibly, this kind of code extraction and bundling isn’t included in the TypeScript compiler — and I hope they add this in the future and make ts-project-bundle redundant.
Now, we want to build the Docker image.
Navigate to the directory of the main project, then invoke the Docker build command like this:
docker build .. -f ./Dockerfile -t hello-worldNote how we are using the parent directory as the build context. This is because the
Docker build stage needs access to the parent directory, which includes the code for both the main project and the shared libraries.
The Dockerfile is in the same directory as the main project to keep it relevant and connected to that microservice. Other microservices should also have their own Dockerfiles, and you may want to share a templated Dockerfile — but that’s a different blog post.
Because the Dockerfile is in a different directory to the build context, we have to specify it manually and that’s why we use the -f argument above.
After building the Docker image, you can run a container like this:
docker run hello-worldThis method of sharing code is scalable. Once again, the example here is relatively simple, but we can easily add more code libraries and microservices to it. To recap:
- We are using TypeScript project references to ensure that building any main project also builds its shared libraries
- We are using
ts-project-bundleto bundle the code for a microservice, including any and all libraries that it depends on - We are using
recursive-installto install npm dependencies for each microservice and all of its shared libraries
If you’re wondering what the bundled code looks like, please see figure 5 below. You may also like to build the code for yourself and inspect it. You won’t even need Docker installed to do that — just navigate to the main project, invoke npm run build, and poke around in the generated build subdirectory to see the compiled and bundled code.
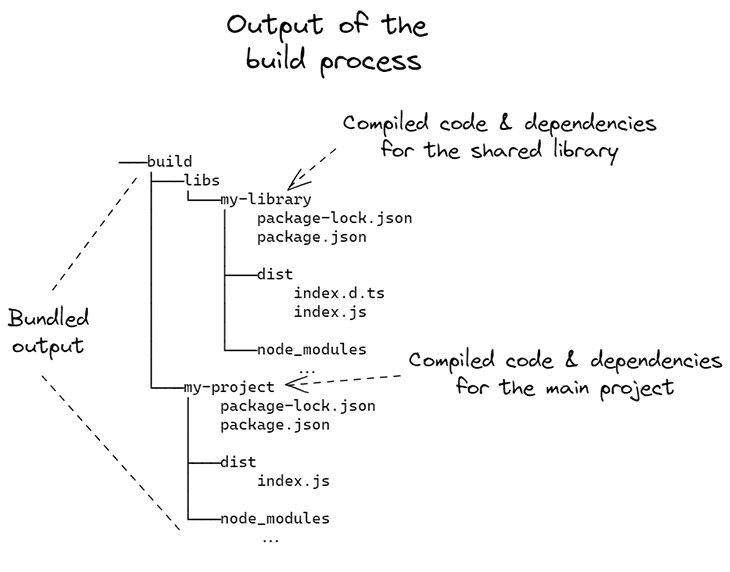
Figure 5: Output of the build process
Example 3: Sharing code libraries between backend and frontend
This example also has a Docker microservice, but it works the same way as in the previous example, so I won’t explain that again.
We’ll now focus on sharing the code library to the frontend. The example UI is created with TypeScript and React, and is bundled with Parcel.
Figure 6 explains the structure of this project.

Figure 6: Sharing code between backend and frontend
This example has the directories backend, frontend, and libs. Again, this project layout is extensible: you can add more libraries to the libs directory and more microservices to the backend directory.
The structure is also flexible: you can put it all in a mono-repo or you can fully separate it out as a meta-repo with individual code repositories for each microservice, each library, and the frontend.
Listing 5 shows the simple HTML code for our example frontend.
Listing 5: Simple HTML file for the frontend
<!DOCTYPE html>
<html lang="en">
   <head>
      <title>A simple React frontend using Parcel</title>
   </head>
   <body>
      <div id="root"></div>
      <script src="./src/index.tsx"></script>
   </body>
</html>
This example uses the React framework, and in Listing 5 you can see the root element where our React UI will be rendered. The subsequent script tag imports the TypeScript code file index.tsx. This is the main code file for our React UI. It is also the only TypeScript code file in the main project because this is a simple example.
Listing 6 shows index.tsx using React to render the UI for the frontend. Notice how we are importing the function from our shared library and using it to render the “Hello, World!” message in the frontend.
Listing 6: React code for the frontend
import React from "react";
import ReactDOM from "react-dom";

import { showMessage } from "../../libs/my-library";

class App extends React.Component {
    render() {
        return <div>{showMessage()}</div>;
    }
}

ReactDOM.render(<App />, document.getElementById("root"));
To link to the shared library, we again use TypeScript project references. You can see this for yourself in the frontend’s tsconfig.json file, but it isn’t different from what you’ve seen in the earlier examples.
To make this frontend usable in a web browser, we must now compile it to a static web page. Parcel makes this easy. It’s a zero-configuration bundler that automatically understands TypeScript. It understands most common asset types out of the box, and for everything else, there’s a plugin.
I’m currently using Parcel v1 but will convert to v2 when it’s more mature. If you want to learn more, the Parcel docs have a great section on using TypeScript and React.
To compile our frontend, we’ll invoke parcel build. I’ll remind you of my personal convention, where I wrap this up in npm run build — remember that this is helpful because, whatever type of project I’m in, I only have to remember this one command instead of trying to remember the vagaries of different command line tools.
You can see what this looks like in Listing 7 below, which is a simplified extract from the frontend’s package.json.
Listing 7: Extract from package.json showing npm scripts
"scripts": {
   "build": "tsc --build && parcel build index.html --out-dir=out",
},
Listing 7 first invokes the TypeScript compiler using the --build argument to build the frontend project and all the shared libraries. Then we invoke parcel build and point it at index.html, which in turn points at index.tsx and specifies the output directory. This compiles our TypeScript code to JavaScript and bundles it into a single JavaScript file that is included in the compiled HTML file.
You should try running this and confirm for yourself that the generated static webpage indeed contains the code from our shared library. Navigate to the frontend directory and either run this:
npx tsc
parcel build index.html --out-dir=out
Or, more simply, run this:
npm run buildNow, navigate to the out subdirectory to see the compiled HTML and JavaScript files. Search for “Hello, World!” and you’ll find the code from the shared library that has been bundled into the static webpage.
That’s all there is to it. I told you this example was less complicated than the last!
Now, you might say, this is great for Parcel, but what about bundler X? My first choice for this was actually not to use Parcel — I tried to build this example using Create React App, but unfortunately, it doesn’t yet support project references.
In my own development, I’m moving away from webpack because Parcel is much simpler, so I haven’t yet tried this with webpack. I’d be surprised if it didn’t work because under the hood, webpack will use the TypeScript compiler — or possibly Babel — so project references should work.
If you do try to implement this with webpack or any other bundler, please let me know how it works out for you!
Conclusion
In this post, we’ve explored three different ways to share TypeScript code libraries. After briefly looking at the standard ways to share code (via the npm registry or GitHub), we explored alternative, lightweight approaches to sharing libraries between components in a larger application, like between microservices or between the backend and frontend.
The examples I have presented here are extensible. We can scale them up to include more code libraries, more microservices, etc., and this approach works well either with a mono-repo or a meta-repo. It even works well with just ad hoc folders on your computer — although, in that case, I’m not sure why you aren’t using version control, but hey.
The missing piece of the puzzle that I built for myself was ts-project-bundle, which you can find on npm and GitHub. I hope someday that ts-project-bundle will be a relic of history and that the TypeScript compiler itself will support an effective means of bundling or exporting compiled JavaScript code. Let’s hope they correct this because it seems like an obvious omission to me!
If you like what I’ve written here, please watch my video on the topic. Please get in touch!
Resources
- Example code: https://github.com/ashleydavis/sharing-typescript-code-libraries
- Documentation for TypeScript project references: https://www.typescriptlang.org/docs/handbook/project-references.html
- ts-project-bundle
- Video on sharing TypeScript libraries: https://www.youtube.com/watch?v=y76n6Ow83YQ