The problem
I recently implemented support for AI tagging of videos in my product Sortal. A part of the feature is that you can then play back the videos you uploaded. I thought, no problem — video streaming seems pretty simple.
In fact, it is so simple (just a few lines of code) that I chose video streaming as the theme for examples in my book Bootstrapping Microservices.
But when we came to testing in Safari, I learned the ugly truth. So let me rephrase the previous assertion: video streaming is simple for Chrome, but not so much for Safari.
Why is it so difficult for Safari? What does it take to make it work for Safari? The answers to these questions are revealed in this blog post.
Try it for yourself
Before we start looking at the code together, please try it for yourself! The code that accompanies this blog post is available on GitHub. You can download the code or use Git to clone the repository. You’ll need Node.js installed to try it out.
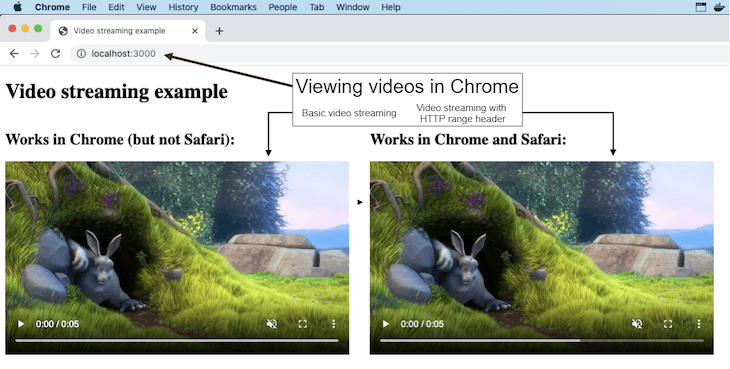
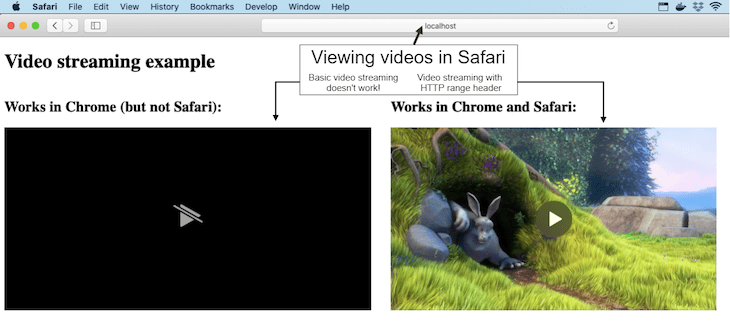
Start the server as instructed in the readme and navigate your browser to http://localhost:3000. You’ll see either Figure 1 or Figure 2, depending on whether you are viewing the page in Chrome or Safari.
Notice that in Figure 2, when the webpage is viewed in Safari, the video on the left side doesn’t work. However, the example on the right does work, and this post explains how I achieved a working version of the video streaming code for Safari.

Figure 1: Video streaming example viewed in Chrome.

Figure 2: Video streaming example viewed in Safari. Notice that the basic video streaming on the left is not functional.
Basic video streaming
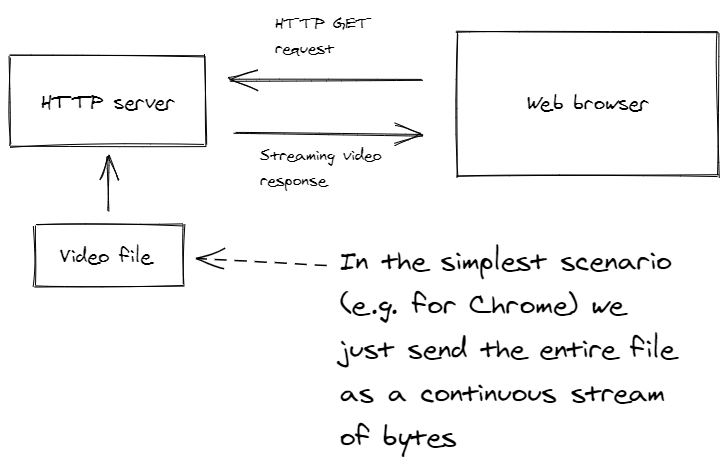
The basic form of video streaming that works in Chrome is trivial to implement in your HTTP server. We are simply streaming the entire video file from the backend to the frontend, as illustrated in Figure 3.

Figure 3: Simple video streaming that works in Chrome.
In the frontend
To render a video in the frontend, we use the HTML5 video element. There’s not much to it; Listing 1 shows how it works. This is the version that works only in Chrome. You can see that the src of the video is handled in the backend by the /works-in-chrome route.
Listing 1: A simple webpage to render streaming video that works in Chrome
<!doctype html>
<html>
    <head>
        <meta charset="utf-8">
        <title>Video streaming example</title>
        </head>
    <body>
        <video
            muted
            playsInline
            loop
            controls
            src="/works-in-chrome"
            >
        </video>
    </body>
</html>
In the backend
The backend for this example is a very simple HTTP server built on the Express framework running on Node.js. You can see the code in Listing 2. This is where the /works-in-chrome route is implemented.
In response to the HTTP GET request, we stream the whole file to the browser. Along the way, we set various HTTP response headers.
The content-type header is set to video/mp4 so the browser knows it’s receiving a video.
Then we stat the file to get its length and set that as the content-length header so the browser knows how much data it’s receiving.
Listing 2: Node.js Express web server with simple video streaming that works for Chrome
const express = require("express");
const fs = require("fs");

const app = express();

const port = 3000;

app.use(express.static("public"));

const filePath = "./videos/SampleVideo_1280x720_1mb.mp4";

app.get("/works-in-chrome", (req, res) => {
    // Set content-type so the browser knows it's receiving a video.
    res.setHeader("content-type", "video/mp4");


    // Stat the video file to determine its length.
    fs.stat(filePath, (err, stat) => {
        if (err) {
            console.error(`File stat error for ${filePath}.`);
            console.error(err);
            res.sendStatus(500);
            return;
        }

        // Set content-length so the browser knows
        // how much data it is receiving.
        res.setHeader("content-length", stat.size);

        // Stream the video file directly from the
        // backend file system.
        const fileStream = fs.createReadStream(filePath);
        fileStream.on("error", error => {
            console.log(`Error reading file ${filePath}.`);
            console.log(error);
            res.sendStatus(500);
        });

        // Pipe the file to the HTTP response.
        // We are sending the entire file to the
        // frontend.
        fileStream.pipe(res);
    });
});

app.listen(port, () => {
    console.log(`Example app listening at http://localhost:${port}`)
});
But it doesn’t work in Safari!
Unfortunately, we can’t just send the entire video file to Safari and expect it to work. Chrome can deal with it, but Safari refuses to play the game.
What’s missing?
Safari doesn’t want the entire file delivered in one go. That’s why the brute-force tactic of streaming the whole file doesn’t work.
Safari would like to stream portions of the file so that it can be incrementally buffered in a piecemeal fashion. It also wants random, ad hoc access to any portion of the file that it requires.
This actually makes sense. Imagine that a user wants to rewind the video a bit — you wouldn’t want to start the whole file streaming again, would you?
Instead, Safari wants to just go back a bit and request that portion of the file again. In fact, this works in Chrome as well. Even though the basic streaming video works in Chrome, Chrome can indeed issue HTTP range requests for more efficient handling of streaming videos.
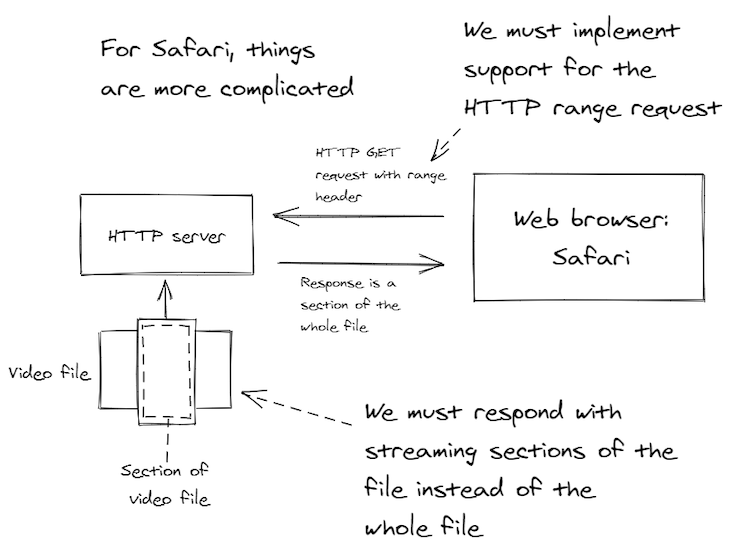
Figure 4 gives you an idea of how this works. We need to modify our HTTP server so that rather than streaming the entire video file to the frontend, we can instead serve random access portions of the file depending on what the browser is requesting.

Figure 4: For video streaming to work in Safari, we must support HTTP range requests that can retrieve a portion of the video file instead of the whole file.
Supporting HTTP range requests
Specifically, we have to support HTTP range requests. But how do we implement it?
There’s surprisingly little readable documentation for it. Of course, we could read the HTTP specifications, but who has the time and motivation for that? (I’ll give you links to resources at the end of this post.)
Instead, allow me to guide you through an overview of my implementation. The key to it is the HTTP request range header that starts with the prefix "bytes=".
This header is how the frontend asks for a particular range of bytes to be retrieved from the video file. You can see in Listing 3 how we can parse the value for this header to obtain starting and ending values for the range of bytes.
####Listing 3: Parsing the HTTP range header
const options = {};

let start;
let end;

const range = req.headers.range;
if (range) {
    const bytesPrefix = "bytes=";
    if (range.startsWith(bytesPrefix)) {
        const bytesRange = range.substring(bytesPrefix.length);
        const parts = bytesRange.split("-");
        if (parts.length === 2) {
            const rangeStart = parts[0] && parts[0].trim();
            if (rangeStart && rangeStart.length > 0) {
                options.start = start = parseInt(rangeStart);
            }
            const rangeEnd = parts[1] && parts[1].trim();
            if (rangeEnd && rangeEnd.length > 0) {
                options.end = end = parseInt(rangeEnd);
            }
        }
    }
}
Responding to the HTTP HEAD request
An HTTP HEAD request is how the frontend probes the backend for information on a particular resource. We should take some care with how we handle this.
The Express framework also sends HEAD requests to our HTTP GET handler, so we can check the req.method and return early from the request handler before we do more work than is necessary for the HEAD request.
Listing 4 shows how we respond to the HEAD request. We don’t have to return any data from the file, but we do have to configure the response headers to tell the frontend that we are supporting the HTTP range request and to let it know the full size of the video file.
The accept-ranges response header used here indicates that this request handler can respond to an HTTP range request.
Listing 4: Responding to the HTTP HEAD request
if (req.method === "HEAD") {
    res.statusCode = 200;

    // Inform the frontend that we accept HTTP
    // range requests.
    res.setHeader("accept-ranges", "bytes");

    // This is our chance to tell the frontend
    // the full size of the video file.
    res.setHeader("content-length", contentLength);

    res.end();
}
else {
    // ... handle a normal HTTP GET request ...
}
Full file vs. partial file
Now for the tricky part. Are we sending the full file or are we sending a portion of the file?
With some care, we can make our request handler support both methods. You can see in Listing 5 how we compute retrievedLength from the start and end variables when it is a range request and those variables are defined; otherwise, we just use contentLength (the complete file’s size) when it’s not a range request.
Listing 5: Determining the content length based on the portion of the file requested
let retrievedLength;
if (start !== undefined && end !== undefined) {
    retrievedLength = (end+1) - start;
}
else if (start !== undefined) {
    retrievedLength = contentLength - start;
}
else if (end !== undefined) {
    retrievedLength = (end+1);
}
else {
    retrievedLength = contentLength;
}
Send status code and response headers
We’ve dealt with the HEAD request. All that’s left to handle is the HTTP GET request.
Listing 6 shows how we send an appropriate success status code and response headers.
The status code varies depending on whether this is a request for the full file or a range request for a portion of the file. If it’s a range request, the status code will be 206 (for partial content); otherwise, we use the regular old success status code of 200.
Listing 6: Sending response headers
// Send status code depending on whether this is
// request for the full file or partial content.
res.statusCode = start !== undefined || end !== undefined ? 206 : 200;

res.setHeader("content-length", retrievedLength);

if (range !== undefined) {
    // Conditionally informs the frontend what range of content
    // we are sending it.
    res.setHeader("content-range",
        `bytes ${start || 0}-${end || (contentLength-1)}/${contentLength}`
    );
    res.setHeader("accept-ranges", "bytes");
}
Streaming a portion of the file
Now the easiest part: streaming a portion of the file. The code in Listing 7 is almost identical to the code in the basic video streaming example way back in Listing 2.
The difference now is that we are passing in the options object. Conveniently, the [createReadStream](https://nodejs.org/api/fs.html#fs_fs_createreadstream_path_options) function from Node.js’ file system module takes start and end values in the options object, which enable reading a portion of the file from the hard drive.
In the case of an HTTP range request, the earlier code in Listing 3 will have parsed the start and end values from the header, and we inserted them into the options object.
In the case of a normal HTTP GET request (not a range request), the start and end won’t have been parsed and won’t be in the options object, in that case, we are simply reading the entire file.
Listing 7: Streaming a portion of the file
const fileStream = fs.createReadStream(filePath, options);
fileStream.on("error", error => {
    console.log(`Error reading file ${filePath}.`);
    console.log(error);
    res.sendStatus(500);
});

fileStream.pipe(res);
Putting it all together
Now let’s put all the code together into a complete request handler for streaming video that works in both Chrome and Safari.
Listing 8 is the combined code from Listing 3 through to Listing 7, so you can see it all in context. This request handler can work either way. It can retrieve a portion of the video file if requested to do so by the browser. Otherwise, it retrieves the entire file.
Listing 8: Full HTTP request handler
app.get('/works-in-chrome-and-safari', (req, res) => {

    // Listing 3.
    const options = {};

    let start;
    let end;

    const range = req.headers.range;
    if (range) {
        const bytesPrefix = "bytes=";
        if (range.startsWith(bytesPrefix)) {
            const bytesRange = range.substring(bytesPrefix.length);
            const parts = bytesRange.split("-");
            if (parts.length === 2) {
                const rangeStart = parts[0] && parts[0].trim();
                if (rangeStart && rangeStart.length > 0) {
                    options.start = start = parseInt(rangeStart);
                }
                const rangeEnd = parts[1] && parts[1].trim();
                if (rangeEnd && rangeEnd.length > 0) {
                    options.end = end = parseInt(rangeEnd);
                }
            }
        }
    }

    res.setHeader("content-type", "video/mp4");

    fs.stat(filePath, (err, stat) => {
        if (err) {
            console.error(`File stat error for ${filePath}.`);
            console.error(err);
            res.sendStatus(500);
            return;
        }

        let contentLength = stat.size;

        // Listing 4.
        if (req.method === "HEAD") {
            res.statusCode = 200;
            res.setHeader("accept-ranges", "bytes");
            res.setHeader("content-length", contentLength);
            res.end();
        }
        else {
            // Listing 5.
            let retrievedLength;
            if (start !== undefined && end !== undefined) {
                retrievedLength = (end+1) - start;
            }
            else if (start !== undefined) {
                retrievedLength = contentLength - start;
            }
            else if (end !== undefined) {
                retrievedLength = (end+1);
            }
            else {
                retrievedLength = contentLength;
            }

            // Listing 6.
            res.statusCode = start !== undefined || end !== undefined ? 206 : 200;

            res.setHeader("content-length", retrievedLength);

            if (range !== undefined) {
                res.setHeader("content-range", `bytes ${start || 0}-${end || (contentLength-1)}/${contentLength}`);
                res.setHeader("accept-ranges", "bytes");
            }

            // Listing 7.
            const fileStream = fs.createReadStream(filePath, options);
            fileStream.on("error", error => {
                console.log(`Error reading file ${filePath}.`);
                console.log(error);
                res.sendStatus(500);
            });


            fileStream.pipe(res);
        }
    });
});
Updated frontend code
Nothing needs to change in the frontend code besides making sure the video element is pointing to an HTTP route that can handle HTTP range requests.
Listing 9 shows that we have simply rerouted the video element to a route called /works-in-chrome-and-safari. This frontend will work both in Chrome and in Safari.
Listing 9: Updated frontend code
<!doctype html>
<html>
    <head>
        <meta charset="utf-8">
        <title>Video streaming example</title>
        </head>
    <body>
        <video
            muted
            playsInline
            loop
            controls
            src="/works-in-chrome-and-safari"
            >
        </video>
    </body>
</html>
Conclusion
Even though video streaming is simple to get working for Chrome, it’s quite a bit more difficult to figure out for Safari — at least if you are trying to figure it out by yourself from the HTTP specification.
Lucky for you, I’ve already trodden that path, and this blog post has laid the groundwork that you can build on for your own streaming video implementation.
Resources
- Example code for this blog post
- A Stack Overflow post that helped me understand what I was missing
- HTTP specification
- Useful Mozilla documentation: